There’s something undeniably magical about dried beans. Tiny, humble, and unassuming in their raw form, these pantry staples hold the promise of rich, hearty flavors and nourishing meals that comfort both body and soul. Yet, for many home cooks, the journey from dried bean to savory dish can feel like a mystery wrapped in a riddle-intimidating soaking times, confusing cooking methods, and the ever-present fear of ending up with mushy or undercooked beans. But fear not: mastering the art of cooking dried beans from scratch is not only achievable, it’s deeply rewarding. In this article, we’ll unravel the secrets behind transforming these tiny legumes into tender, flavorful masterpieces, unlocking a world of culinary possibility that’s as ancient as it is timeless. Whether you’re a seasoned chef or a curious beginner, prepare to embark on a delicious adventure that starts with a simple bean-and ends in savory satisfaction.
From Scratch to Savory: Mastering the Art of Cooking Dried Beans begins with an essential selection process. Choosing the right beans is the cornerstone of turning humble legumes into a delicious, hearty meal that resonates with rustic charm and wholesome nutrition. Whether you’re craving creamy cannellini, earthy black beans, or nutty chickpeas, each variety offers a unique flavor profile and texture to elevate your culinary adventure.
Prep and Cook Time
Preparation: 8-12 hours soaking (can be quick-soaked)
Cooking: 60-90 minutes simmering, depending on bean type
Yield
Approximately 6 servings
Difficulty Level
Medium – perfect for enthusiastic home cooks eager to refine fundamental skills
Ingredients
- 1 cup dried beans (pinto, black, kidney, or navy)
- 4 cups cold water for soaking
- 6 cups fresh water or low-sodium vegetable broth for cooking
- 1 small onion, peeled and halved
- 2 cloves garlic, smashed
- 1 bay leaf
- 1 teaspoon salt (added toward end of cooking)
- 2 tablespoons olive oil (optional, for finishing)
Instructions
- Rinse the beans under cold running water thoroughly to remove dust or debris.
- Soak the beans:
- Traditional soak: Place beans in a large bowl, cover with 4 cups cold water, soak for 8-12 hours or overnight.
- Quick soak: Boil beans in 4 cups water for 2 minutes, cover, remove from heat and soak for 1 hour.
- Drain and rinse the soaked beans well to remove any residual oligosaccharides that cause digestive discomfort.
- Combine beans, fresh water or broth, onion, garlic, and bay leaf in a large pot. Bring to a gentle boil.
- Reduce heat to low and simmer uncovered, stirring occasionally, until beans are tender but not mushy. This usually takes 60-90 minutes depending on bean type.
- Check doneness: Begin tasting after 45 minutes to avoid overcooking. Beans should be creamy and tender but hold their shape.
- Season with salt in the last 10 minutes of cooking to enhance flavor without toughening the skins.
- Drain beans or reserve cooking liquid for soups or stews. Drizzle with olive oil if desired for sheen and richness.
Chef’s Notes
- Variety matters: Experiment with heirloom beans or regional varieties like cranberry or borlotti for vibrant colors and flavors.
- Herbs and aromatics: Fresh rosemary, thyme, or smoked paprika can be added for layered complexity.
- Texture tip: Avoid stirring vigorously during simmering to prevent skins from breaking prematurely.
- Make-ahead magic: Cooked beans store beautifully in an airtight container refrigerated up to 5 days or frozen up to 3 months.
- Skip the soak: If pressed for time, use canned beans but rinse well to reduce sodium and retain a fresh taste.
Serving Suggestions
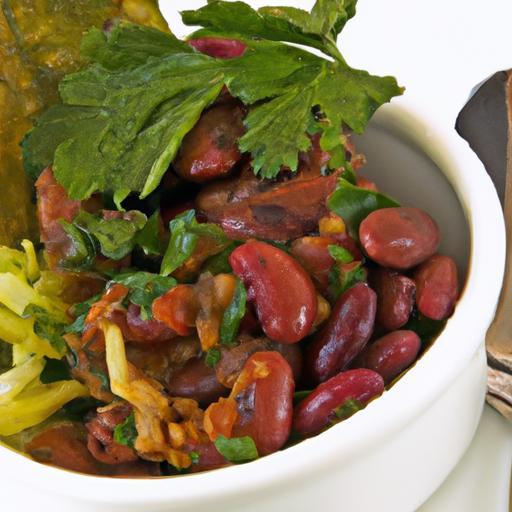
Serve your perfectly cooked beans as a vibrant main or versatile side. Spoon over fluffy rice or creamy polenta with a drizzle of chili oil and fresh herbs. Add a sprinkle of crumbled feta or toasted nuts for contrast. For a Middle Eastern twist, transform them into a lively bean salad with diced tomatoes, cucumbers, and a zesty lemon dressing. Garnish with bright parsley or cilantro to elevate both flavor and presentation.

| Nutrient | Amount per Serving |
|---|---|
| Calories | 200 kcal |
| Protein | 13 g |
| Carbohydrates | 35 g |
| Fat | 1 g |
For more inspiration on legume-based dishes, explore our Vegetarian Legume Recipes Collection and enhance your plant-powered kitchen arsenal. Discover the art of soaking and cooking from an expert source at The Kitchn.
Q&A
Q&A: From Scratch to Savory – Mastering the Art of Cooking Dried Beans
Q1: Why should I choose dried beans over canned beans?
A: Dried beans are like little culinary unicorns-affordable, nutrient-packed, and with a depth of flavor canned beans just can’t match. When cooked from scratch, they develop a creaminess and texture that elevates any dish from good to gourmet. Plus, you gain control over salt, seasoning, and even the cook time, tailoring every bite to your liking.
Q2: What’s the first step in transforming those humble dried beans into a savory delight?
A: Begin with a thorough rinse-beans can carry dust and debris from their journey to your kitchen. Then, soak them! Soaking hydrates the beans, reduces cooking time, and can even help reduce those sometimes troublesome digestive effects. An overnight soak in cool water is classic, but a quick soak (boil for 2 minutes, then rest for an hour) works when time is tight.
Q3: Do all beans require soaking?
A: While many common varieties like black beans, kidney beans, and chickpeas benefit from soaking, tiny lentils and split peas are an exception-they cook quickly and can be tossed in dry straight to the pot. Soaking times can vary based on the bean type and your available time, but it’s always worth considering for improved texture and digestibility.
Q4: How do I know when my beans are perfectly cooked?
A: Patience is key. Beans are done when they’re tender but not mushy-imagine a gentle bite that yields easily without falling apart. Start checking at the minimum cooking time given in your recipe, then taste every 10 minutes or so until that perfect texture sings. Remember, altitude, bean age, and variety all affect cook times!
Q5: Can I add salt or acidic ingredients right at the start?
A: It’s best to hold off on salt or acidic ingredients like tomatoes, vinegar, or citrus until your beans are tender. Adding them too early can toughen the skins, elongating your cooking time and frustrating your savory ambitions. Season your pot liberally once the beans are nearly done, and adjust to taste.
Q6: What are some creative ways to infuse flavor during cooking?
A: Think of your cooking liquid as a blank canvas-garlic cloves, onion halves, bay leaves, smoked paprika, or fresh herbs like thyme and rosemary can all simmer alongside your beans, imparting subtle layers of flavor. Want a smoky twist? Add a strip of smoked bacon or a bit of chipotle pepper. The possibilities are as vast as your pantry!
Q7: How do I store leftover cooked beans?
A: Let your beans cool in their flavorful cooking liquid-this keeps them moist and tasty. Store them in an airtight container in the fridge for up to 5 days, or freeze portions for up to 3 months. When reheating, use the bean broth to help maintain that perfect creamy texture.
Q8: Any final tips for mastering the art of dried bean cooking?
A: Embrace experimentation and patience-every bean batch is a delicious adventure. Keep a cooking diary to note soak times, flavor additions, and cooking durations that deliver your ideal bean. Soon enough, you’ll wield your beans like a savory sorcerer, turning humble legumes into culinary gold!
Concluding Remarks
From humble beginnings in a handful of dried beans to a simmering pot of rich, savory goodness, mastering the art of cooking dried beans is a journey worth savoring. With patience, technique, and a dash of creativity, you transform simple pantry staples into culinary treasures that nourish both body and soul. Whether folded into stews, tossed in salads, or served as a hearty side, dried beans invite endless possibilities. So next time you reach for that bag of beans, remember-you’re not just cooking a meal, you’re crafting a story of flavors, textures, and traditions, all from scratch. Embrace the process, experiment boldly, and enjoy every delicious step along the way.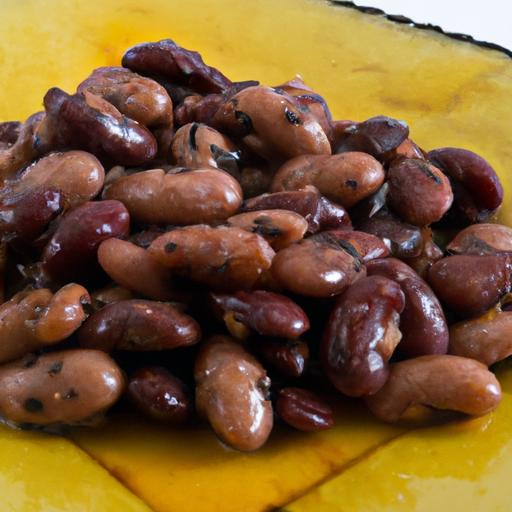


