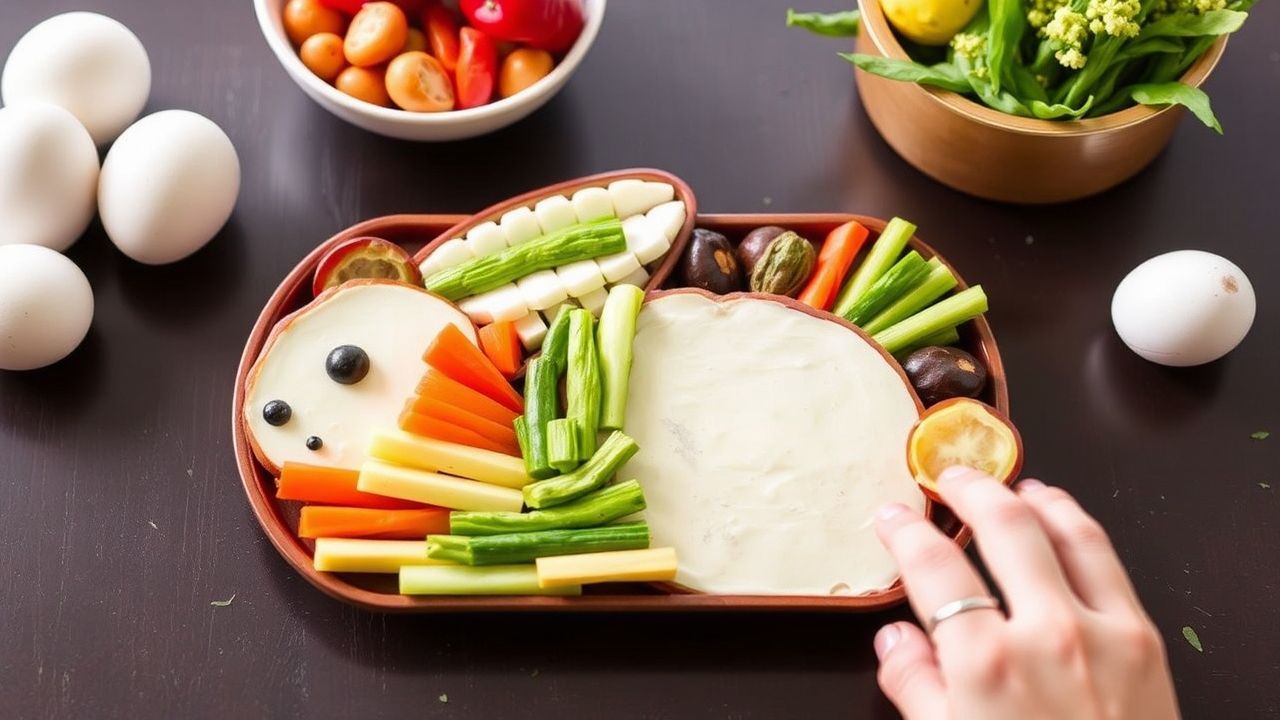
As Easter approaches, reframe the candy routine with a playful, nutritious centerpiece. A bunny-shaped Easter veggie tray turns fresh produce into an eye-catching platter that invites healthy snacking for all ages.
- Prep and Cook Time
- Yield
- Difficulty Level
- Ingredients
- Instructions
- Tips for Success
- Serving Suggestions
- Variations and Substitutions
- Nutrition Snapshot
- Food Safety and Storage
- Q&A
- What is a Bunny-Shaped Easter Veggie Tray?
- Why choose a bunny shape for the veggie tray?
- What vegetables work best for the bunny shape?
- How can I encourage guests to dig in?
- Can this tray be customized for dietary needs?
- Insights and Final Notes
- Easy assembly: No cooking required; build with raw vegetables.
- Kid-friendly: Shape and color entice picky eaters.
- Versatile: Swap veggies and dips to fit diets and allergies.
Prep and Cook Time
Preparation: 20 minutes. No cooking required—this platter relies on crisp, raw vegetables to hold shape and texture.
Plan assembly close to serving time to preserve crunch. If you prep parts ahead, chill and wrap to maintain freshness and appearance.
Yield
Serves 6-8 as a fresh appetizer or party platter when arranged densely. Portion sizes depend on guest appetite and whether other mains are present.
For larger gatherings, duplicate the layout on multiple platters or use tiered boards to create a playful buffet display.
Difficulty Level
Easy. Basic knife skills and an eye for symmetry produce a professional-looking tray without stress.
Tools you’ll need include a sharp chef’s knife, small bowls for dips, and a large serving board. Optional cookie cutters speed up decorative shapes.
Ingredients
Choose firm, fresh produce for structure. The classic layout uses a large floret as the body and long vegetables to outline ears and accents.
Substitute freely to match availability, color palette, or dietary needs. For example, broccoli can replace cauliflower for a greener body.
- 1 large head of cauliflower, cut into florets (for the bunny’s body)
- 1 medium carrot, sliced into thin rounds and small sticks (for ears and decoration)
- 1 cucumber, cut lengthwise into thin strips (ears outline)
- 1 cup cherry tomatoes, halved (for feet and accent)
- 1 bell pepper (red or yellow), thinly sliced (for whiskers)
- 1 bunch green beans, trimmed (to create the tail outline)
- 1/2 cup baby carrots (for the “bunny’s nose”)
- 1 cup snap peas (for accent greenery around)
- Fresh parsley or dill sprigs, optional for garnish
- Assorted dips: Greek yogurt ranch, hummus, and avocado cilantro dip
Instructions
Assemble on a clean, dry board or platter. Visualize the silhouette first: central rounded body, ears above, feet below, and small facial accents in the center.
Work from the center outward to control spacing and symmetry. Keep spare pieces handy to fill gaps and add color contrast as you go.
- Prepare your base: Place a large cutting board or serving platter as your canvas. Position cauliflower florets centrally to form the bunny’s rounded body shape.
- Shape the ears: Arrange cucumber strips vertically above the cauliflower to create long bunny ears. Layer thin carrot sticks inside the cucumber strips for dimension and color contrast.
- Form the face and accents: Place a small cluster of baby carrots or a single baby carrot in the center of the cauliflower for the nose. Build the whiskers by fanning out thin bell pepper slices on either side.
- Create feet and tail: Group cherry tomato halves at the bottom of the cauliflower for bunny feet. Outline the tail with a curve of green beans to mimic fluffy texture.
- Fill in gaps: Surround the bunny with snap peas and additional carrot rounds to add volume and vibrant pops of color.
- Finalize with dips: Pour chosen healthy dips into small bowls and place them alongside the bunny tray. Greek yogurt ranch complements crisp cauliflower, while hummus and avocado-based dips add creamy richness.
Tips for Success
Select vegetables that resist limpness to keep shapes firm during service. Cold, dry produce slides into place and keeps edge details crisp.
Assemble the tray within 30–45 minutes of serving when possible. If you must prep in advance, store components separately and assemble just before guests arrive.
- Choose firm, crisp vegetables for optimal shape retention and crunch.
- To keep the bunny visually appealing and fresh, assemble the platter close to serving time.
- Use airtight wrap and chilled storage if prepping in advance to prevent wilting.
- Creative substitutions: swap cauliflower with broccoli for more green, or add radish slices for a peppery zing.
- For a kid-friendly twist, decorate with edible eyes or small cheese cubes to bring the bunny face to life.
Serving Suggestions
Present the bunny-shaped tray as the centerpiece at brunch, baby showers, or spring gatherings. Surround it with pastel napkins and simple serving utensils to keep focus on the produce.
Offer at least two dip options to cover common preferences—one tangy yogurt-based dip and one protein-rich hummus. Label dips clearly for guests with allergies.
For more party ideas and complementary platters, pair this tray with other finger-friendly plates from your collection. See our internal resources for themed spreads: Healthy Snack Ideas for Kids and Party Planning Tips.
Variations and Substitutions
Change the color story by choosing vegetables that match your theme. Swap orange carrots for yellow bell pepper or add purple cauliflower for a bold contrast.
For vegan or allergy-conscious gatherings, ensure dips avoid dairy and common allergens. Offer simple olive oil with herbs as a neutral option.
Nutrition Snapshot
Vegetable-based platters deliver fiber, vitamins, and low-calorie satisfaction. A standard serving on this tray averages modest calories while providing micronutrients and hydration.
Adjust portion sizes and dips to manage calories and protein. Pairing vegetables with protein-rich dips improves satiety and balances the snack.
| Nutrient | Per Serving |
|---|---|
| Calories | 75 kcal |
| Protein | 3 g |
| Carbohydrates | 12 g |
| Fat | 1.5 g |
Learn basic vegetable science and serving guidance from the broad concept of vegetables on Wikipedia. For cultural context on springtime symbols, see Easter traditions.
Food Safety and Storage
Keep raw vegetables chilled at or below 40°F (4°C) before serving to limit bacterial growth. Use refrigeration for pre-cut produce and consume within 24–48 hours for best quality.
Cover trays lightly with plastic wrap while chilled and remove wrap at serving to avoid condensation. Avoid leaving the platter at room temperature for more than two hours during service.
Q&A
Common questions help hosts prepare and customize this tray effectively. The answers below address shape choices, prep timing, and audience preferences.
Each reply gives practical steps so you can assemble with confidence and minimal fuss.
What is a Bunny-Shaped Easter Veggie Tray?
A bunny-shaped tray is a creative arrangement of fresh produce sculpted into an Easter bunny silhouette. It offers a colorful, nutritious centerpiece that invites healthy snacking while matching seasonal décor.
Use a large round floret for the body, long strips for ears, and small rounds for facial features to achieve the recognizable shape.
Why choose a bunny shape for the veggie tray?
The bunny evokes spring renewal and playful imagery that makes vegetables more appealing to children. Visual presentation increases engagement and encourages sampling.
Pair the tray with themed napkins and simple labeling to reinforce the festive feel and guide guests to dip choices.
What vegetables work best for the bunny shape?
Firm, colorful vegetables hold shapes well: cauliflower or broccoli for the body, cucumber and carrot for ears, cherry tomatoes for feet, and bell pepper strips for whiskers.
Consider the texture of each piece; mix crunchy and tender-crisp items to maintain variety and mouthfeel.
How can I encourage guests to dig in?
Offer two or three well-labeled dips and place them in small bowls around the bunny. Interactive presentation—like hollowed pepper bowls—invites exploration and sampling.
Position the dips at accessible points and refresh garnishes periodically to keep the tray visually appealing throughout the event.
Can this tray be customized for dietary needs?
Yes. Use dairy-free dips, gluten-free ingredients, and clearly mark allergen-free options. Swap items to respect guest preferences without losing visual charm.
For plant-forward protein options, include a tahini-based dip or a hummus with added roasted chickpeas for texture and protein.
Insights and Final Notes
The bunny-shaped veggie tray blends aesthetics with nutrition, offering a practical way to elevate spring gatherings. With simple tools and thoughtful layout, hosts can create a memorable and healthy centerpiece.
For inspiration on related spreads and dip recipes, explore internal guides such as Dip Recipes Collection and Healthy Snack Ideas for Kids. For technique reference on raw vegetable platters, review the classic concept of crudités and the specific vegetable profile of cauliflower.
Embrace the season, keep the layout simple, and let fresh produce do the visual and nutritional heavy lifting for your Easter celebration.
See also: Veggie tray


